
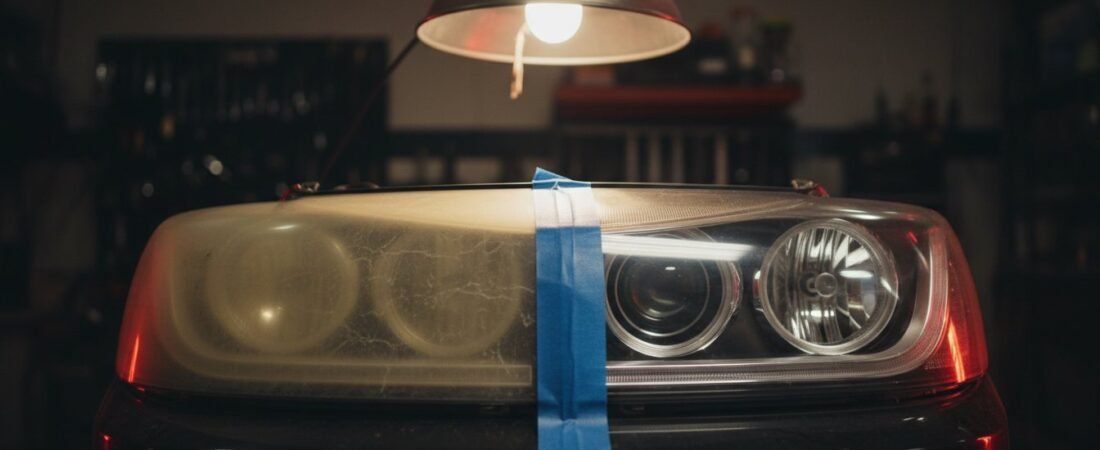
You’ve seen the videos. Toothpaste, bug spray, a bit of sandpaper, and the headlight goes from this to this. It genuinely works. For about four months. Then it comes back worse, and now you know why nobody tells you: every one of those hacks removes the only thing protecting the plastic.
I’m a certified master paint technician (B&P TEAM, 2019). Headlights aren’t glass and aren’t paint. They’re a coated plastic, and once you understand the coating the whole thing makes sense.
The short answer
Toothpaste and similar hacks remove what is left of the lens’s protective coating, so the yellowing comes back. Mask the paint, wet sand in stages, polish, then apply a hard UV-resistant coating. That coating is the real protection.
What you need
Picks that fit this job.
CERAKOTE Headlight Restoration Kit
Adds a UV coating back after you restore the lens.
Check on Amazon3M Wet & Dry Sandpaper
Wet-and-dry sandpaper for the lens. Check the grits before you buy.
Check on AmazonAutomotive Refinish Masking Tape
Protects edges and trim before you polish.
Check on AmazonMeguiar’s Ultimate Polishing Compound
A polishing compound for the step after sanding.
Check on AmazonI picked these on listing quality and have not tested them yet. Affiliate links: as an Amazon Associate I earn from qualifying purchases, at no extra cost to you.
What a Headlight Lens Is
The lens is polycarbonate: light, cheap to mould into complex shapes, and extremely impact-resistant. But it has one serious weakness: UV destroys it. Left bare in sunlight it photo-oxidises: polymer chains break down and the surface goes yellow, then cloudy, then microscopically cracked.
So every lens has a hard UV-resistant coating from the factory. That coating is the real protection. The plastic underneath is just the shape. And the coating is sacrificial: years of UV, heat cycling, road grit, wiper spray and washing wear it away, usually unevenly, which is why lenses go patchy or start yellowing at the top where the sun hits hardest. Once it’s breached, UV reaches bare polycarbonate and yellowing accelerates, because nothing is slowing it down.
Why the Hacks Fail
Toothpaste, baking soda, scouring pads and cutting compound are mild abrasives. They remove the yellowed, oxidised surface layer of the polycarbonate, and it works, because the damage really is in the top surface. Bug spray works differently: some contain solvents that temporarily soften and re-flow the surface, so the haze appears to vanish. It looks spectacular for days and it’s chemically attacking the lens while it does. Don’t.
What they all have in common: whatever remains of the factory coating, they remove. Every one. You’ve turned a lens with a damaged coating into a lens with no coating, bare polycarbonate pointed at the sun. Visibly yellow again in months, and each round takes more off a lens that isn’t getting thicker. The hack isn’t wrong about how to clear a lens. It’s missing the last step, the one that matters.
The Restoration That Lasts
- Mask the paint generously. Sanding a lens is fine. Sanding the wing beside it is a respray.
- Wash, then wet sand in stages, keeping everything soaking wet. Start coarse enough to cut through the damaged layer, then step progressively finer. Sand one direction per stage, then cross 90° for the next, so you can see when the previous stage’s scratches are gone. Don’t skip grades: each stage removes the scratches from the one before, and jumping two means the final polish can’t reach them.
- Polish by machine or hand until the lens is genuinely clear, not just less yellow.
- Wipe with IPA or panel wipe. The lens must be perfectly clean, dry and oil-free. Polish residue will ruin the coating.
- Apply a proper UV-resistant clear: a dedicated headlight coating, a 2K clear aerosol, or a ceramic-type lens coating. This is the step the hacks lack, and it’s the difference between four months and several years. You’re not polishing a headlight. You’re re-manufacturing the protective layer the factory put there. Don’t coat a wet lens.
Choosing a Headlight Restoration Kit
A headlight restoration kit is only worth buying if it covers the whole job. Check the box for three things: sanding discs or sheets in several grits, a polish or compound, and a UV-resistant coating. That last one matters most. A kit that sands and polishes but adds no UV protection leaves bare plastic facing the sun, and the yellowing comes back.
Also check whether the kit needs a drill, and how long the coating has to cure before rain or washing. If the lens is cracked, or the damage is inside the headlight, no kit will fix it.
Why It Matters Beyond Looks
A yellowed, hazy lens doesn’t just dim your light. It scatters it. The designed beam pattern (sharp cutoff, light where you need it, darkness where oncoming drivers’ eyes are) stops working: less light down the road and more glare at everyone else. Check the beam on a wall or garage door with the lights on. That tells you more than looking at the lens.
- Sandpaper (fine wet-and-dry): 3M Wet & Dry Sandpaper. A badly yellowed lens may need a coarser starting grade.
- Masking: Automotive Refinish Masking Tape
- Polish: Meguiar’s Ultimate Polishing Compound
- UV coating: CERAKOTE Headlight Restoration Kit
Safety: sanding dust needs PPE, and light output is a genuine safety issue.
Try This
Look at your headlights tonight with the lights on.
Quick FAQ
Why do headlights turn yellow? The factory UV coating wears away and UV then oxidises the bare polycarbonate.
Does toothpaste fix foggy headlights permanently? No. It removes the remaining coating, so the yellowing returns in months.
What makes a headlight restoration last? Re-applying a UV-resistant coating after sanding and polishing.
Affiliate disclosure: Some links in this post are Amazon affiliate links. As an Amazon Associate I earn from qualifying purchases, at no extra cost to you. Prices on Amazon change, so check the current price there. I haven’t personally tested every product yet, and I’ll update this post with honest verdicts as I do.
Related posts: Road Tar: The Silent Paint Killer (and It’s Not the Tar) · Bug Splatter on Your Bumper: Clean It the Day You Get Home · Why Soap Won’t Clean Your Car: Traffic Film
Master guide: how to wash a car without scratching it